Category: Uncategorized

  • Dmitri’s Paper Airplane

    Dmitri's Paper Airplane
    Dmitri’s Paper Airplane

    A simple paper airplane design and indeed a real classic. This plane is slightly more complex than the classic dart above but flies further and is more accurate. This design was sent to me by Dmitri through email and so I dedicate it to him on this site.

    Video Instructions

    Written Instructions

    Fold as shown in the images below

    Dmitri's Paper Airplane Dig 1
    Dig 1

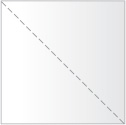
    Start with a plain sheet of A4 (or printer) paper as in DIG 1

    Dmitri's Paper Airplane Dig 2
    Dig 2

    Now fold down one wing as shown in DIG 2 you will notice that this is not lined up with the middle of the paper as you see with other designs

    Dmitri's Paper Airplane Dig 3
    Dig 3

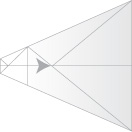
    Now fold in the other side of the plane as in DIG 3… make sure that the outcome is totally symmetrical (apart from the little flap of paper) you will want the coming tip to be right in the middle

    Dmitri's Paper Airplane Dig 4
    Dig 4

    Now flip over giving you DIG 4

    Dmitri's Paper Airplane Dig 5
    Dig 5

    Now fold in that little flap of paper as in DIG 5

    Dmitri's Paper Airplane Dig 6
    Dig 6

    Now fold the plane in half as in DIG 6

    Dmitri's Paper Airplane Dig 7
    Dig 7

    Now fold down the wings as in DIG 7

    Dmitri's Paper Airplane Dig 8
    Dig 8

    How to Fly

    This is another classic design which Dmitri kindly showed me over email. It flies very well thrown hard or soft my main advice is to throw this plane parallel to the ground and not angled up or down when you throw it. Try adding flaps on the wings to get it to do stunts.

  • Classic Dart Paper Airplane

    Classic Dart
    Classic Dart

    This paper airplane is designed for bored people in offices, lectures and classrooms the world over. 7 folds and throw, there isn’t a difficult part in making this plane. I must dedicate it to Peter Batey who received my email for a few weeks and sent me this design.

    Video Instructions

    Written Instructions

    Classic Dart Dig 1
    Dig 1

    1. Take an A4 sheet and fold it in half DIG. 1

    Classic Dart Dig 2
    Dig 2

    2. Fold the short edge of one side down to the first fold (ie produces a 45Degree angle). Do This for the other side too. DIG. 2

    Classic Dart Dig 3
    Dig 3

    3. Fold down the new fold you have created to the original fold you did in (1). Repeat for the other side. DIG. 3

    Classic Dart Dig 4
    Dig 4

    4. Do step 3 again for both sides DIG. 4

    Classic Dart Dig 5
    Dig 5

    5. Hold Centre and open wings out. Now Throw!!! DIG. 5

    How to Fly

    Oh come on we all know how to fly these! Well I’ll just give a refresher course. You throw this plane overarm and on the level. It will fly quite far and very straight if you have made it correctly. It is very hard to make it so poorly that it crashes. It flies very well indoors and out.

  • Origami Paper Airplane II

    Origami Paper Airplane II
    Origami Paper Airplane II

    To my knowledge this plane is Japanese in origin and it is a fantastic flier you will love it. Play around with it add stabilisers and flaps, it can be a good stunt plane too.

    Video Instructions

    Written Instructions

    Origami Paper Airplane II Dig 1
    Dig 1

    1. Firstly fold the sheet in half along the line shown in DIG. 1 and then open it out again marking the quarter line at the top as shown in DIG. 1.

      Origami Paper Airplane II Dig 2
      Dig 2

      2. Then fold the bottom left hand corner to the top quarter line along the dotted line shown in DIG. 1 to give you DIG. 2. Make sure the flap is folded from the center line to the top quarter line precisely otherwise the plane is unsymmetrical.

      Origami Paper Airplane II Dig 3
      Dig 3

      3. Then fold the top left hand corner to the top quarter line along the dotted line shown in DIG. 2 to give you DIG. 3.

      4. Now fold the tip marked as A to the point on the base marked B along the dotted line shown in DIG. 3. Then open the plane out again leaving a firm crease.

      Origami Paper Airplane II Dig 4
      Dig 4

      5. Now fold the left point to the crease made in Step 4 along the dotted line shown in DIG. 4

      Origami Paper Airplane II Dig 5
      Dig 5

      6. Now fold the blunt left edge to the crease made in Step 4 along the dotted line shown in DIG. 5 and fold the whole thing over along the crease made in Step 4 to give DIG. 6

      Origami Paper Airplane II Dig 6
      Dig 6

      7. Now fold along the center line marked on DIG. 6 to give DIG. 7

      Origami Paper Airplane II Dig 7
      Dig 7

      8. Now fold wings down along dotted lines in DIG. 7

      How to Fly

      I would advise you to throw this paper airplane inside overarm as hard as you can almost level with the ground but perhaps (if anything) tilted slightly up towards the sky when you release the paper airplane.

      You could also throw it underarm as hard as you can in the air. If it catches a breeze outside then it will fly a long way if you do this. You could also throw it overarm outside.

    1. Paper Blimp

      Paper Blimp
      Paper Blimp

      This isn’t really a plane but is a great little paper airship it looks good and it works great! This is a paper aircraft from Michael O’Reilly who runs The Best Paper Airplane

      Video Instructions

      Written Instructions

      Paper Blimp Dig 1
      Dig 1

      Cut a long strip of writing paper as shown and notch each end as indicated in DIG. 1

      Paper Blimp Dig 2
      Dig 2

      Bend it over and slip each noch together. You will end up with a shape similar to a fish when looking through the opening as shown in DIG. 2.

      That is all there is to assembly. Now place a small pebble (you could also use blue tac or soft silly putty) where indicated and squeeze the stone with your thumb and forefinger. Throw the stone and paper belt straight up. If you do it right the stone will lift the paper to an altitude until the stone begins to fall back to earth. The stone falls out of the loop and the airship begins to spin over the axis and gently returns to earth. When it spins it blurs together and looks just like and airship

      How to Fly

      Simply dropping the blimp off a balcony, stairwell or out of a high window is the safest way to fly it. It works best out doors where it can fly a long distance. You should drop the blimp parallel to the ground (not nose first or tail first) for the best results.

      Throwing the blimp with a stone in its nose is your second option you could also use blue tac or soft silly putty. This takes practise and requires you to be very careful you don’t hit anyone. Throw the blimp with the stone grasped between finger and thumb vertically upwards and you can get it very high indeed. It will glide a long way floating like a blimp on the air currents. The first people I showed it to called it the flying fish. I like this name a lot!

    2. Origami Paper Airplane III

      Origami Paper Airplane III
      Origami Paper Airplane III

      This is a really easy to make paper airplane that you will love flying again and again. The blunt nose makes it really easy to reuse as it does not easily get damaged. It is another classic design that has been around for many years and I really like it.

      Video Instructions

      Written Instructions

      Origami Paper Airplane III Dig 1
      Dig 1

      Fold the square piece of paper along the two diagonals on DIG. 1 creasing well on both lines and opening out the paper again afterwards.

      Origami Paper Airplane III Dig 2
      Dig 2

      Now fold along the dotted line in DIG. 2 bringing the left hand edge to the diagonal center line from top right to bottom left. This will give you DIG. 3.

      Origami Paper Airplane III Dig 3
      Dig 3

      Now fold along the dotted line in DIG. 3 which should make things nice and symmetrical again.

      Origami Paper Airplane III Dig 4
      Dig 4

      Fold the tip down on the existing crease as shown by the arrow in DIG. 4

      Origami Paper Airplane III Dig 5
      Dig 5

      Now fold the blunt nose over again along the dotted line in DIG. 5

      Origami Paper Airplane III Dig 6
      Dig 6

      Now fold along the center line marked on DIG. 6

      Origami Paper Airplane III Dig 7
      Dig 7

      Now fold the wings down along the dotted lines in DIG. 7

      How to Fly

      This paper airplane can be thrown overarm quite hard with the nose pointing slightly upwards or can be thrown in a sweep from underarm as hard as you can directly upwards. It should then sort itself out and fly down to earth very well. This plane is great indoors or out.

    3. Nick’s Paper Airplane

      Nick's Paper Airplane
      Nick’s Paper Airplane

      This paper airplane is a superb glider it is very well balanced indeed even when made by the most inexperienced child. It can be quickly made from a sheet of A4 paper and I really like it. I drew this page up and placed it on the internet within a day of learning to make this paper airplane.

      Video Instructions

      Written Instructions

      Nick's Paper Airplane Dig 1
      Dig 1

      Firstly fold the sheet in half along the line shown in DIG. 1 and then open it out again.

      Nick's Paper Airplane Dig 2
      Dig 2

      Fold the two top corners in to the center line to give the form in DIG. 2

      Nick's Paper Airplane Dig 3
      Dig 3

      Then fold the top large triangle over so that the two flaps formed in step 2 are underneath the large triangle. Your paper should now look like DIG. 3

      Nick's Paper Airplane Dig 4
      Dig 4

      From the form in DIG. 3 fold the two top corners into the center line again in such a way that you get the form in DIG. 4

      Nick's Paper Airplane Dig 5
      Dig 5

      Now fold the small triangle up over the two flaps to give DIG. 5

      Nick's Paper Airplane Dig 6
      Dig 6

      Fold along the center line so that the small triangle is on the underside of the plane on the outside along with the two flaps as shown in DIG. 6

      Nick's Paper Airplane Dig 7
      Dig 7

      Fold along the line AB on DIG. 6 then turn the plane over and do the same to the other side producing DIG. 7.

      Nick's Paper Airplane Dig 8
      Dig 8

      Fold along the line labelled AB on the diagram first one way and then the other creasing really well. Tuck the triangular shaped depression in-between the two wings to produce DIG. 8. This stabilises the plane if you do not make it perfectly since to make it absolutely symmetrically is beyond my abilities.

      How to Fly

      This paper airplane is easy to throw. You should throw it overarm with the nose pointing slightly up while holding the plane about 1/4 of it’s length from the front.

      Nicks paper airplane will fly a very long distance indeed. If you throw it outdoors and you have made it from a large piece of paper it can fly for hundreds of meters. If you throw it on a very hot day from an upper story window it can catch thermals and then you’re really talking!

    4. Paper Frisbee

      Paper Frisbee
      Paper Frisbee

      Video Instructions

      Written Instructions

      Paper Frisbee Dig 1
      Dig 1

      Take a sheet of square paper about 6cm by 6cm (or 3inches by 3inches) and fold it diagonally across along the dotted line in DIG. 2

      Paper Frisbee Dig 2
      Dig 2

      Now fold the tip down along the dotted horizontal line in DIG. 3

      Paper Frisbee Dig 3
      Dig 3

      You now have your basic repeating unit as shown in DIG. 4. Make eight of these units.

      Paper Frisbee Dig 4
      Dig 4

      Put a spot of glue on the point marked “a” in DIG. 5 and slide into the pocket of the next unit. Do this for all eight units and at the end you will have a complete circle similar to that in the diagram at the top of the page.

      Paper Frisbee Dig 5
      Dig 5

      How to Fly

      Hold the frisbee as at the beginning of the animation to the left and flick your arm and wrist throwing the frisbee spinning at the quickest moment of arm movement.

      Unfortunately the frisbee does not fly well when thrown like a normal frisbee I am working on finding a tesellation that goes together to form a frisbee that flies like the traditional ones.

    5. Flying Fish Paper Airplane

      The Flying Fish Paper Airplane
      The Flying Fish Paper Airplane

      One difficult fold in the whole of this plane. It is a unique design (I think) a bit weird but really flies well in a straight line as a glider. It will stomach a bit of poor folding too so a good one to try if some of the other designs don’t fly well for you.

      Video Instructions

      Written Instructions

      The Flying Fish Paper Airplane Dig 1
      Dig 1

      First make the normal fold down the middle as shown in DIG. 1and then re-open the paper flat (but with a crease down the middle).

      The Flying Fish Paper Airplane Dig 2
      Dig 2

      Then fold in the top left hand corner to the center line and the top right hand corner in the same manner along the diagonal dotted lines shown in DIG. 2 this should give you the form in DIG. 3 (yellow denotes the “underside” of the sheet of paper)

      The Flying Fish Paper Airplane Dig 3
      Dig 3

      Fold the two sides EQUALLY in to the center line along the dotted lines in DIG. 3. This should give the symmetric form in DIG. 3

      The Flying Fish Paper Airplane Dig 4
      Dig 4

      Simply fold point A to meet point B in DIG. 4 make this fold along the dotted line and then crease hard and open the paper again then fold along this line in the opposite direction, crease hard and unfold again.

      The Flying Fish Paper Airplane Dig 5
      Dig 5

      Now fold C to meet D (indicated in DIG. 5), crease hard and unfold. Repeat with A and B.

      The Flying Fish Paper Airplane Dig 6
      Dig 6

      In DIG. 6 press in on the points marked C and D pushing the paper up along the fold made in Step 4 and giving the pushed inwards and upwards sides hopefully indicated in DIG. 6.

      The Flying Fish Paper Airplane Dig 7
      Dig 7

      Now fold up point A marked in DIG. 7 to meet point B. This should only involve folding up a flap of paper. The crease should be made VERY HARD and then unfolded and this flap tucked inside the nose of the plane. There should be a very obvious pocket in which to do this.

      The Flying Fish Paper Airplane Dig 8
      Dig 8

      Now simply fold out the undercarriage as shown in DIG. 8 to give DIG. 9. This final form should then be thrown by holding the pocket mentioned in Step 7 and angling the nose of the plane very slightly downwards. A gentle throw will result in a long glide.

      The Flying Fish Paper Airplane Dig 9
      Dig 9

      How to Fly

      The Flying Fish paper airplane is one of my favorites to fly.

      Throw gently with nose pointed slightly downwards. Hold inside the fold created by the nose pocket to throw.

      The long straight nature of the plane and tucked in nose encourages it to fly in a straight line even if the manufacture isn’t perfect. It must be emphasised that a gentle throw is the best way to succeed with this design.

    6. Paper Helicopter

      Paper Helicopter
      The Paper Helicopter

      OK! So it isn’t a plane but it is a good model and when simply dropped it will stay aloft for ages and spiral down excellently.

      Video Instructions

      Written Instructions

      Paper Helicopter Outline
      Paper Helicopter Outline

      Cut along all the solid lines on the diagram above.

      Fold flap A forward and flap B to the back.

      Fold flaps C and D both forward along the dotted lines.

      Fold along the line E upward to give a weight at the bottom.

      Now this should look like the diagram at the top.

      You can scale up this model as much as you want. You just drop the model with the blades facing upwards and the weight at the bottom facing downwards for the best results.

      How to Fly

      Hold by the rectangle of paper beneath the blades and then let go pulling your hand out of the way very quickly. Everything about this helicopter is simple: making it and flying it. This is why it is my favorite paper aircraft.

    7. Rapier Paper Airplane

      I love this plane (I did design it but I can brag can’t I?) it flies like a glider but has the elegant shape and great precision of a dart. This plane is the best of both worlds and is so easy to make it must be the best plane on the site!

      Video Instructions

      Written Instructions

      Rapier Paper Airplane Dig 1
      Dig 1

      First take a rectangular A4 (8 1/2″ by 11″) sheet of paper and fold down the center dotted line on DIG. 1 opening it out again afterwards.

      Rapier Paper Airplane Dig 2
      Dig 2

      Take the first 1cm (1/2″) of the rectangular sheet and fold it up along the dotted line in DIG. 2

      Rapier Paper Airplane Dig 3
      Dig 3

      Fold the flap over and over until about 3/8 of the length of the sheet is folded in this concertina fashion as in DIG. 3 this should give a heavy and thick front lip.

      Rapier Paper Airplane Dig 4
      Dig 4

      Now fold along the two dotted lines in DIG. 3 bringing the top edges into the center line and fold along the center line to give DIG. 4 as a side view5Fold the wings down along the dotted line in DIG. 4 one either side of the center. Now the plane should look like the diagram at the top of the page.

      How to Fly

      The rapier paper airplane is another great plane for trying to hit your teacher or lecturer with. It flies fast and true indoors exactly where you want it to go.

      Just hold it about 1/4 of its length from the nose tip and throw it overarm quite gently. If you want the plane to circle make one wing higher at the back than the other (but only slightly). This will make the plane circle with the lower wing towards the center of the circle. Be careful not to poke anyone’s eye out though!