



// VIDEO GUIDE
// STEP-BY-STEP INSTRUCTIONS

STEP 01
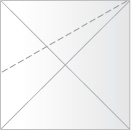
Fold the square piece of paper along the two diagonals on DIG. 1 creasing well on both lines and opening out the paper again afterwards.
STEP 02
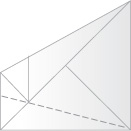
Now fold along the dotted line in DIG. 2 bringing the left hand edge to the diagonal center line from top right to bottom left. This will give you DIG. 3.
STEP 03
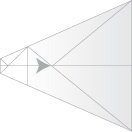
Now fold along the dotted line in DIG. 3 which should make things nice and symmetrical again.
STEP 04
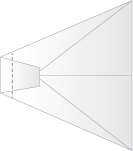
Fold the tip down on the existing crease as shown by the arrow in DIG. 4
STEP 05
Now fold the blunt nose over again along the dotted line in DIG. 5
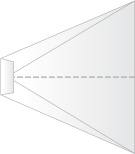
STEP 06
Now fold along the center line marked on DIG. 6
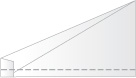
STEP 07
Now fold the wings down along the dotted lines in DIG. 7
// HOW TO FLY
This paper airplane can be thrown overarm quite hard with the nose pointing slightly upwards or can be thrown in a sweep from underarm as hard as you can directly upwards. It should then sort itself out and fly down to earth very well. This plane is great indoors or out.
// YOU MIGHT ALSO LIKE
Origami Paper Airplane IIJapanese in origin — a fantastic flier with optional stabilisersOrigami Paper AirplaneDense at the front, flies far when thrown hard — airplane or dart?Classic Dart Paper AirplaneThe classic 7-fold dart — designed for bored people everywhereDmitri’s Paper AirplaneSimple classic design that flies further and more accurately than most
Also by this author: free digital marketing cheat sheets