Author: alexorig

  • Sabretooth Paper Airplane

    Sabretooth Paper Airplane
    Sabretooth Paper Airplane

    The sabretooth paper airplane flies fantastically if thrown straight up into the air or as a normal glider. It is great!

    Video Instructions

    Written Instructions

    Sabretooth Paper Airplane Dig 1
    Dig 1

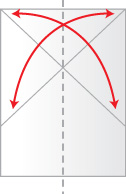
    Take a plain A4 size piece of paper as in DIG. 1.

    Sabretooth Paper Airplane Dig 2
    Dig 2

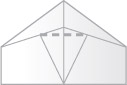
    Fold the top and bottom left hand corners into the center as in DIG. 2

    Sabretooth Paper Airplane Dig 3
    Dig 3

    Now fold the entire left hand side triangle to the right to give DIG. 3.

    Sabretooth Paper Airplane Dig 4
    Dig 4

    Turn the entire sheet over and repeat the action in DIG. 2 and then turn the sheet back over to give you DIG. 4. You can see this at 0:55.

    Sabretooth Paper Airplane Dig 5
    Dig 5

    Now fold the small left hand triangle to the right along the dotted line in DIG. 4 making A meet B. This gives you DIG. 5.

    Sabretooth Paper Airplane Dig 6
    Dig 6

    Turn the paper over to give DIG. 6

    Sabretooth Paper Airplane Dig 7
    Dig 7

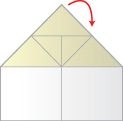
    The two small triangles at the left hand end are flaps of paper. Tuck your finger into the lower of these two flaps and pull it out as shown by the arrows in DIG. 6. If you do this correctly you will find you have DIG. 7. See this at 1:29 in the video.

    Sabretooth Paper Airplane Dig 8
    Dig 8

    Now repeat this process with the other of the two triangles to give DIG. 8

    Sabretooth Paper Airplane Dig 9
    Dig 9

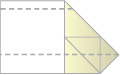
    Now turn the form in DIG. 8 to give you DIG. 9.

    Sabretooth Paper Airplane Dig 10
    Dig 10

    Fold along the dotted lines in DIG. 10 to give you the form shown head on in DIG. 11 . This can be done in one of two ways. Both fly quite well. See what works best for you.

    Sabretooth Paper Airplane Dig 11
    Dig 11

    Flying Instructions

    This is a fantastic plane. Throw it as hard as possible vertically up into the air. Prefferably with a strong wind blowing towards you and just watch the plane soar and dive like a bird. It is almost always slight unsymmetrical and so this paper airplane will also fly in a huge arc. The lower the plane falls the faster it gets as well. It is brilliant if a little hard to make.

  • Lightning Paper Airplane

    Lightning Paper Airplane
    Lightning Paper Airplane

    This is my own design which appears identical to the original Sabertooth paper airplane but is a totally different design. This paper airplane will fly superbly if made well, try it out.

    Video Instructions

    Written Instructions

    Lightning Paper Airplane Dig 1
    Dig 1

    Start with a sheet of paper as in DIG. 1and crease hard down the center making a valley fold.

    Lightning Paper Airplane Dig 2
    Dig 2

    Now fold (as indicated by the arrows in DIG. 2) the top left corner down so the top edge lies along the right hand side, creasing hard. Unfold and repeat with the top right hand corner so the top edge lies along the left hand side and unfold. See 0:30 in the video.

    Lightning Paper Airplane Dig 3
    Dig 3
    Lightning Paper Airplane Dig 4
    Dig 4

    The next step is to fold the top edge down following the arrows in DIG. 3. The top left corner should meet the bottom left end of the diagonal folds made in step 2. The top right should meet the bottom right of these folds. This will give you DIG. 4

    Lightning Paper Airplane Dig 5
    Dig 5
    Lightning Paper Airplane Dig 6
    Dig 6

    Open out the plane again and fold in on the lines in DIG. 5 to give DIG. 6. You can see this at 1:50 in the video.

    Lightning Paper Airplane Dig 7
    Dig 7

    Now fold down the triangle at the top of the plane to touch the point at which the two corners from step 4 meet. This means folding down on the line in DIG. 6 to give DIG. 7.

    Lightning Paper Airplane Dig 8
    Dig 8

    Now pull the ends of the horizontal crease formed earlier and pull them in towards the centre line as indicated in DIG. 8. You can see this at 2:25 in the video.

    Lightning Paper Airplane Dig 9
    Dig 9
    Lightning Paper Airplane Dig 10
    Dig 10

    Now take the vertical flap which will have been created by step 6 and is shown in DIG. 9 and then press it flat to give DIG. 10. You can see this at 2:29 in the video.

    Fold the top triangle along the horizontal line in DIG. 10 folding it underneath as the arrow indicates.

    Lightning Paper Airplane Dig 12
    Dig 11

    Tuck your fingers into each of the triangular flaps formed in turn and pull them out as indicated in DIG. 11. You can see this on the video at 2:40.

    Lightning Paper Airplane Dig 13
    Dig 12

    Press these flaps flat to give the form shown in DIG. 12

    Lightning Paper Airplane Dig 13
    Dig 13

    Now fold along the centre crease again to give DIG. 13

    Lightning Paper Airplane Dig 14
    Dig 14

    Fold along the lines in DIG. 13 to give DIG. 14.

    Flying Instructions

    This plane is one of my own designs and is named in homage to magnificent P-38 Lightning fighter airplane of WWII in having twin fuselages see pictures here.

    Throw underarm quite hard holding the nose between forefinger and thumb or even better throw very hard straight up in the air in a large hall.

    If made slightly asymmetrically this plane should gracefully loop down to earth in a wide circle and will stay aloft for a long time. This plane has many of the aspects common to world record beating paper aircraft.

  • Origami Paper Airplane

    Origami Paper Airplane
    Origami Paper Airplane

    It is hard to decide if this is a airplane or dart. It is very dense at the front and if thrown hard will fly far. This is a hard exercise in folding and also for me in writing and drawing instructions. Hope you like it!

    Video Instructions

    Written Instructions

    Origami Paper Airplane Dig 1
    Dig 1

    Take a square piece of paper and fold it down the middle then open it out and fold along the lines AB in DIG. 1. Now you should have a shape like DIG. 2.

    Origami Paper Airplane Dig 2
    Dig 2

    Now fold along the line AB in DIG. 2 you should get DIG. 3. It is important that the fold AB is midway up the flaps created in STEP 1.

    Origami Paper Airplane Dig 3
    Dig 3

    Now fold along the lines XZ on DIG. 3 and unfold having creased very well along these lines. Then fold them in the other direction creasing well and unfold.

    Origami Paper Airplane Dig 4
    Dig 4

    Tuck the flaps produced in the previous step inside as the arrows show on DIG. 4. This step is tough so look at 5:20 in the video to see how to do this.

    Origami Paper Airplane Dig 5
    Dig 5

    Fold the tip down along the dotted line in DIG. 5.

    Origami Paper Airplane Dig 6
    Dig 6

    Now fold along the two dotted lines in DIG. 6.

    Origami Paper Airplane Dig 7
    Dig 7

    To finish the model off fold along the dotted lines in DIG. 7 to give you the form at the top of the page.

    Flying Instructions

    This plane is basically a dart. Throw it as hard as you can straight in the direction you want it to go overarm. It flies equally well indoors and out and doesn’t really have any lift or do stunts. It is just a challenge to make and a pleasure once you succeed.

  • Cobra Paper Airplane

    Cobra Paper Airplane
    Cobra Paper Airplane

    This is a paper airplane I designed which flies straight and true and is a fairly easy plane to make !

    Video Instructions

    Written Instructions

    Cobra Paper Airplane Dig 1
    Dig 1

    Hold a sheet of paper in portrait orientation and fold in half (lengthways) along the line shown in DIG. 1 then open out again.

    Cobra Paper Airplane Dig 2
    Dig 2

    Now fold in the top left and top right corners of the paper to the centre line as shown in DIG. 2.

    Cobra Paper Airplane Dig 3
    Dig 3

    Fold down the tip of the plane to the centre of the bottom of the top triangle. This fold is shown by an arrow in DIG. 3.

    Cobra Paper Airplane Dig 4
    Dig 4

    Now comes the first tricky bit. Open up the paper to it’s original form so that the dotted lines shown in DIG. 4 mark out the creased lines on the paper.

    Cobra Paper Airplane Dig 5
    Dig 5

    Now pull in the corners and top centre of the paper along the arrows shown in DIG. 4 so that the plane passes through the step shown in DIG. 5.

    The plane should fall relatively comfortably into the form shown in DIG. 5 due to the existing creases.

    Cobra Paper Airplane Dig 6
    Dig 6

    Fold down the trapezium shape at the top of DIG. 6 along the bottom edge of the folded down paper. There are little dotted indicators at each end of the line in DIG. 6 to indicate which line to fold along

    Cobra Paper Airplane Dig 7
    Dig 7

    Now fold and unfold as indicated by the arrows on DIG. 7. This involves folding the top left and right corners into the centre line of the plane at the bottom of the flap folded down in the previous step.

    Cobra Paper Airplane Dig 8
    Dig 8

    Flip over the plane and fold in the opposite direction along the creases created in the previous step then unfold as indicated by the arrows in DIG. 8.

    Cobra Paper Airplane Dig 9
    Dig 9
    Cobra Paper Airplane Dig 10
    Dig 10

    The top left and right corners (labelled A and B) must now be tucked under the flap formed in step 7 (coloured in red) so that they meet at the centre line of the plane at the bottom edge of that flap. The labels are shown in DIG. 9 and the folding should pass through the form shown in DIG. 10 where the red arrows indicate pressure being applied. The positions the arrows are applying pressure to are the corners labelled A and B.

    Cobra Paper Airplane Dig 11
    Dig 11

    Fold the plane in half along the centre line in DIG. 11 keeping all the folded sections on the outside when folding.

    Cobra Paper Airplane Dig 12
    Dig 12
    Cobra Paper Airplane Dig 13
    Dig 13

    Fold down the wings along the dotted lines indicated in DIG. 12 and DIG. 13 to give the form shown in DIG. 14 then open up to give the plane as shown at the top of the page.

    Cobra Paper Airplane Dig 14
    Dig 14

    Flying Instructions

    I am really proud of this plane. I created it during a lecture on Particle Physics (yawn) and it flies really well. This plane should be thrown hard and flat, very simple, very fast.

  • Napkin Paper Airplane

    Napkin Paper Airplane
    Napkin Paper Airplane

    This is a simple design to make but in order for it to fly properly you must practise and that is why it is of medium difficulty. This unusual plane is one of a family of designs and hopefully I will bring you more tubular paper airplanes in the future.

    Video Instructions

    Written Instructions

    Napkin Paper Airplane Dig 1
    Dig 1

    Take a square of paper and fold it in half along the diagonal line shown in DIG. 1

    Napkin Paper Airplane Dig 2
    Dig 2

    Now fold the long edge over 0.5cm (1/5″) and repeat 4 times creasing hard as shown by dotted lines in DIG. 2

    Napkin Paper Airplane Dig 3
    Dig 3

    Now tuck the ends of the folded edge inside each other to form a ring. Crease the thick folded ring repeatedly to make perfectly round. The fold should be on the inside as shown in DIG. 3

    Napkin Paper Airplane Dig 4
    Dig 4

    It is now a fully functional plane but can be improved by rolling the tip of the triangle of paper around a pencil then unravelling it and making a cut to about 1/3 the length of the triangular area right down the middle of the plane. As marked in DIG. 4

    Flying Instructions

    This plane in the simple form without the cut or rolling around a pencil was shown to me by Shaun Wilde in an email. It is best thrown overarm with the heavy end first.

    It can be made to spin like a stunt plane. When the plane is cut in half you make one of the curled up sides more strongly bent than the other. This will give different drag on either side and cause the plane to spin.

  • Nose Heavy Paper Airplane

    Nose Heavy Paper Airplane
    Nose Heavy Paper Airplane

    I think this plane is great and it flies equally as well as the floating paper airplane. I think this is a great plane!

    Video Instructions

    Written Instructions

    Nose Heavy Paper Airplane Dig 1
    Dig 1

    Fold your sheet of A4 paper on diagonal lines as shown on DIG. 1 creasing well.

    Nose Heavy Paper Airplane Dig 2
    Dig 2

    You should get a shape as in DIG. 2

    Nose Heavy Paper Airplane Dig 3
    Dig 3

    Open it out to give DIG. 3and then fold along the dotted line shown.

    Nose Heavy Paper Airplane Dig 4
    Dig 4

    Push in from the two points labelled A on DIG. 3 to give the shape in DIG. 4. This is a challenging step so look at 2:50 in the video.

    Nose Heavy Paper Airplane Dig 5
    Dig 5

    Now flatten out this form and fold along the dotted lines in DIG. 5

    Nose Heavy Paper Airplane Dig 6
    Dig 6

    You should now have the form in DIG. 6. Fold along the dotted line on this.

    Nose Heavy Paper Airplane Dig 7
    Dig 7

    Now you should have the form in DIG. 7.

    Nose Heavy Paper Airplane Dig 8
    Dig 8

    Fold along the dotted lines in DIG. 8. If you want cut in some flaps as shown since this plane often requires them. Now you should have the diagram at the top of the page.

    Flying Instructions

    This plane is great indoors and out throw it overarm both inside and outside quite hard or quite gently. You can do very little wrong in flying this plane.

    Like many of my planes if you throw it hard straight up in the air it will fly a very long distance if there is a touch of wind. If the weather is totally still the plane will probably come straight back down.

  • Trapezium Paper Airplane

    This paper airplane is all wing with a heavy nose. The structure of the nose is quite unusual but very effective. Even if thrown as hard as possible at a wall it will be undamaged. The last time I saw the first one of these I made it was flying towards the Severn estuary from the top of a tall tower in Bristol.

    Video Instructions

    Written Instructions

    Trapezium Paper Airplane Dig 1
    Dig 1

    Fold your sheet of A4 paper along the diagonal lines shown in DIG. 1

    Trapezium Paper Airplane Dig 2
    Dig 2

    You should get the shape shown in DIG. 2

    Trapezium Paper Airplane Dig 3
    Dig 3

    Open it out to give DIG. 3 and fold along the dotted line shown

    Trapezium Paper Airplane Dig 4
    Dig 4

    Push in from the two points labelled A in DIG. 3 to give the shape in DIG. 4.

    Trapezium Paper Airplane Dig 5
    Dig 5

    Now flatten out this form and fold along the dotted lines in DIG. 5. You should find you are folding in flaps created by the previous folds.

    Trapezium Paper Airplane Dig 6
    Dig 6

    This should give you the form in DIG. 6. Again now fold along the dotted line which gives DIG. 7

    Trapezium Paper Airplane Dig 7
    Dig 7

    Fold along the two dotted lines in DIG. 7 again this is just bringing in the two top flaps.

    Trapezium Paper Airplane Dig 8
    Dig 8

    This should give you the form in DIG. 8

    Trapezium Paper Airplane Dig 9
    Dig 9

    The triangular flap in the center (underneath the two flaps you just produced) should have two pockets. Tuck the flaps produced in step 7 into these pockets as shown in DIG. 9

    Trapezium Paper Airplane Dig 10
    Dig 10

    You should be left with a piece of paper looking like DIG. 10

    Trapezium Paper Airplane Dig 11
    Dig 11

    Now turn the plane over and fold along the lines labelled AC and BC in DIG. 11. These folds are very important if you want to produce a plane that flies absolutely level.

    Flying Instructions

    This plane flies well indoors but is useless outdoors as the slightest breeze will make it crash. Hold it very near its shorter edge (the front) underneath the plane. Throw with a pushing motion or overarm so that when you let go it will be level or very slightly tilted downwards. You should find that this plane will glide very slowly for quite a long distance indoors.

  • Edmonton Shadow Paper Plane

    Edmonton Shadow Paper Plane
    Edmonton Shadow Paper Plane

    I designed this plane about 3 hours out of Heathrow in an airliner on the way to Calgary Canada (my first trans-Atlantic flight). It is a really fun plane and I am really pleased with it I hope you like it too.

    Video Instructions

    Written Instructions

    Edmonton Shadow Paper Plane Dig 1
    Dig 1

    Take some A4 (8 1/2″ by 11″) paper and lay it landscape. fold creasing hard along the center line then open it out again and fold along the two dotted lines in DIG. 1I find that the steeper the angle the better the flight at the end. You will get the body in DIG. 2note the fact that the flap folded over on top does not overlap the one beneath and that the shape of the plane is totally symmetrical. You can see this at 2:30 in the video.

    Edmonton Shadow Paper Plane Dig 2
    Dig 2

    Now fold down the nose you are left with along the dotted line in DIG. 2to give the body in DIG. 3.

    Edmonton Shadow Paper Plane Dig 3
    Dig 3

    Fold along the two dotted lines in DIG. 3 forming the shape in DIG. 4 (having brought the two sides of the front edge to meet in the center line).

    Edmonton Shadow Paper Plane Dig 4
    Dig 4

    Now fold along the center of the plane and fold down the two wings as indicated by the dotted lines in DIG. 4to give you a plane looking like that at the top of the page. To improve flight the two wingtips at the very rear of the plane should be folded up totally.

    How to Fly

    This plane is very often biassed to one side or another and will turn this way or that. If you make it absolutely perfect this will not happen but it is practically impossible to make it perfectly.

    To throw the paper airplane throw it gently overarm and it will glide in a wide circle down to the ground. I would always advise folding up the wingtips to give the plane more lift.

  • Dragon Paper Airplane

    Dragon Paper Airplane
    Dragon Paper Airplane

    This is my own design of paper airplane. If you make the wings completely level and throw it hard overarm it will fly fast and level indoors for 30 meters or more and it is quite good outside too. So try it out.

    Video Instructions

    Written Instructions

    Dragon Paper Airplane Dig 1
    Dig 1

    Fold along the dotted line down the center of DIG. 1 then open the paper out and fold along the diagonal lines at the top to give DIG. 2.

    Dragon Paper Airplane Dig 2
    Dig 2

    Fold along the diagonal lines in DIG. 2 bringing the top left and top right edges in to meet along the center line as shown in DIG. 3.

    Dragon Paper Airplane Dig 3
    Dig 3

    Fold along the horizontal dotted line in DIG. 3 bringing the tip of the paper airplane down to the center of the base of the paper as shown in DIG. 4

    Dragon Paper Airplane Dig 4
    Dig 4

    Now fold along the diagonal dotted lines in DIG. 4 to bring the left top edge and right top edge in to meet at the center line as shown in DIG. 5

    Dragon Paper Airplane Dig 5
    Dig 5

    Now fold the flap that points downwards up so that its tip touches the tip of the paper airplane at the front. Fold along the dotted line shown in DIG. 5 to do this. If the tips do not meet go back and alter the folding so that they do. This is very important. You should get the form (approximately) in DIG. 6

    Dragon Paper Airplane Dig 6
    Dig 6

    Now finally fold along the center line and dotted lines in DIG. 6to give you the paper airplane as shown at the top of the page. Throw it hard overarm and it should fly very level and very straight for a long distance.

    How to Fly

    This plane flies well indoors but is useless outdoors as the slightest breeze will make it crash. Hold it very near its shorter edge (the front) underneath the plane. Throw with a pushing motion or overarm so that when you let go it will be level or very slightly tilted downwards. You should find that this plane will glide very slowly for quite a long distance indoors.

  • Floating paper airplane

    Floating paper airplane
    Floating paper airplane

    This paper airplane is really very good. With its wide wing span and the stabilising winglets at the end of wings it is very stable and flies very far.

    Video Instructions

    Written Instructions

    Start with a plain piece of A4 paper and fold it in half as in DIG. 1

    Floating paper airplane Dig 1
    Dig 1

    Then fold down a flap as shown in DIG. 2 and repeat the process with a flap on the other side to give you DIG. 3

    Floating paper airplane Dig 2
    Dig 2
    Floating paper airplane Dig 3
    Dig 3

    Now fold over the overhanging flap along the line in DIG. 3 to give you DIG. 4

    Floating paper airplane Dig 4
    Dig 4

    Then turn the plane over and fold the nose of the plane up to give you DIG. 5

    Floating paper airplane Dig 5
    Dig 5

    Crease again along the middle line and then fold along the dotted lines in DIG. 6. It is important that the folds at the ends of the wing are folded downwards so you get a plane as at the top of the page otherwise the plane flies upside down.

    Floating paper airplane Dig 6
    Dig 6

    How to Fly

    This paper airplane is best indoors. It is quite stable but any major wind outdoors causes it to crash very quickly.

    Try throwing this plane very gently overarm with the nose pointed slightly upwards holding it about a quarter of its length from the nose. In still conditions outdoors or indoors this will let it glide gently for quite a long time and distance.

    If you make a flap at the back of one of the wings by snipping the paper twice for about 1cm (1/2″) into the wing and making the two snips and inch (2cm) apart and then folding the paper inbetween the snips up, the paper airplane should gently glide in a circle back to you. Whether the circle is clockwise or anti-clockwise depends on which wing you place the flap (or aerlon).