


// VIDEO GUIDE
// STEP-BY-STEP INSTRUCTIONS

STEP 01
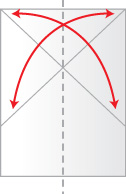
Start with a sheet of paper as in DIG. 1and crease hard down the center making a valley fold.
STEP 02
Now fold (as indicated by the arrows in DIG. 2) the top left corner down so the top edge lies along the right hand side, creasing hard. Unfold and repeat with the top right hand corner so the top edge lies along the left hand side and unfold. See 0:30 in the video.

STEP 03
Follow the diagram above.

STEP 04
The next step is to fold the top edge down following the arrows in DIG. 3. The top left corner should meet the bottom left end of the diagonal folds made in step 2. The top right should meet the bottom right of these folds. This will give you DIG. 4

STEP 05
Follow the diagram above.

STEP 06
Open out the plane again and fold in on the lines in DIG. 5 to give DIG. 6. You can see this at 1:50 in the video.

STEP 07
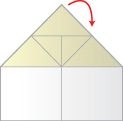
Now fold down the triangle at the top of the plane to touch the point at which the two corners from step 4 meet. This means folding down on the line in DIG. 6 to give DIG. 7.

STEP 08
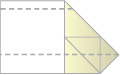
Now pull the ends of the horizontal crease formed earlier and pull them in towards the centre line as indicated in DIG. 8. You can see this at 2:25 in the video.

STEP 09
Follow the diagram above.
STEP 10
Now take the vertical flap which will have been created by step 6 and is shown in DIG. 9 and then press it flat to give DIG. 10. You can see this at 2:29 in the video. Fold the top triangle along the horizontal line in DIG. 10 folding it underneath as the arrow indicates.

STEP 11
Tuck your fingers into each of the triangular flaps formed in turn and pull them out as indicated in DIG. 11. You can see this on the video at 2:40.

STEP 12
Press these flaps flat to give the form shown in DIG. 12
STEP 13
Now fold along the centre crease again to give DIG. 13

STEP 14
Fold along the lines in DIG. 13 to give DIG. 14.
// HOW TO FLY
This plane is one of my own designs and is named in homage to the magnificent P-38 Lightning fighter airplane of WWII in having twin fuselages.
Throw underarm quite hard holding the nose between forefinger and thumb or even better throw very hard straight up in the air in a large hall.
If made slightly asymmetrically this plane should gracefully loop down to earth in a wide circle and will stay aloft for a long time. This plane has many of the aspects common to world record beating paper aircraft.
// YOU MIGHT ALSO LIKE
Sabretooth Paper AirplaneFlies fantastically thrown straight up or as a normal gliderCobra Paper AirplaneAlex’s own design — flies straight and fast, amazing to watchTrapezium Paper AirplaneAll wing with a heavy nose — survives being thrown at high speedFlying Fish Paper AirplaneOne tricky fold but flies brilliantly in a straight line
Also by this author: free digital marketing cheat sheets